Recycled Jeans + Embroidery Hoop + Empty Space on the Wall = Wall Art
Problem solved :)
Get link
Facebook
X
Pinterest
Email
Other Apps
Comments
Anonymous said…
Bronwyn I Love this! I love the way you have placed it in the frame cause it looks like someones "butt cheek" is in there!!! Very cheeky :) LOL TFS Cheers Donna Zammit
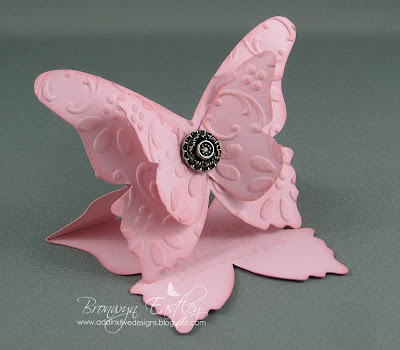
This card uses SU's Blushing Bride card stock and ink, the Beautiful Butterflies Bigz Die and Antique Brads . The sentiment is from the stamp set, Butterfly Prints and I have used the textured impressions embossing folder, Finial Press in this example. If you wish to see my tutorial, it is only available as a pdf file, with the purchase of the Larger Butterfly Easel Card Tutorial. Unfortunately, a few websites have copied my entire tutorial and published it without my consent, including all the photos and instructions. It's just as well I add a watermark to everything. So, after two years of sharing the love, I feel I need to remove the instructions from this post to avoid any further plagiarism. Thanks for your understanding. ........................................................................................................................................................... Disclaimer: My tutorial does not replicate the one that...
Hi and welcome to the ESAD-SU, Sale A Bration Blog Hop . ESAD is an Aussie based group just for E xtremely S pecial A ussie and New Zealand Stampin' Up! D emonstrators. I joined this group just before Christmas and am excited to be part of my very first Blog Hop! I have made some examples from the Happy Moments Sale A Bration Stamp Set. It was a tough decision about which one I'd purchase for the pre-order as I LOVE all four of them! It was the little bird stamp that won me over but I'm looking forward to earning the remaining three during the SAB period. Sample 1 - Gift Box This little gift box was made from a template, taken from the SU Demonstrator Web Site Pattern Library (Box No. 21). It is featured in the SAB Catalogue (page 2), with the Vintage Labels Set. I loved the whole layout, so this is a CASE of the original. Project Recipe: Stamp Sets: Happy Moments (SAB), Boho Backgrounds Cardstock: Textured Sahara Sand, Baja Breeze Ink: Baja Breeze, Kiwi Kiss, Ba...
Photo Wallet and Butterfly Easel Card The Colour Combo for Just Add Ink's 57th Challenge Butterfly Easel Card I designed a butterfly easel card for my latest project at UStamp with Dawn and Friends using the Punch Bunch Stamp Set . For this challenge I popped the little butterfly from the Bliss Set , added some pearls and stamped the gorgeous flourish from the same SAB stamp set to form the background pattern for both die cut butterflies. I also sponged around the edges with River Rock Ink. PS: Thanks again to Nancy Riley for choosing this card as one of her iPicks for this week! Inside the Photo Wallet This would make a Lovely Hostess Gift (especially for a scrap-booking enthusiast) Complete with Photo Mats Instructions for the Photo Wallet can be found HERE . My Tutorial for the Butterfly Easel Card can be found HERE . Project Recipe for Photo Wallet and Butterfly Easel Card Stamps: Bliss (SAB), Fresh Cuts Ink: Cherry Cobbler, Daffodil Delight, River Rock Card Stock...

 Problem solved :)

 Problem solved :)


Comments